Bootstrap Menu Tutorial
Intro
Even the easiest, not speaking of the extra difficult webpages do require several kind of an index for the visitors to simply navigate and discover precisely what they are trying to find in the early number of secs avter their coming over the page. We should really regularly have in your thoughts a user might be in a rush, browsing numerous web pages for a while scrolling over them trying to find something or make a decision. In these particular situations the certain and well specified navigating menu might make the contrast among a single unique customer and the page being clicked away. So the design and behavior of the web page navigation are important indeed. Moreover our web sites get increasingly more watched from mobile phone in this way not having a web page and a site navigation in special acting on smaller sized sreens practically equals not having a page at all and even a whole lot worse.
The good news is the fresh 4th edition of the Bootstrap framework grants us with a great tool to deal with the issue-- the so called navbar component or else the list bar people got used viewing on the peak of the majority of the pages. It is really a simple still effective instrument for wrapping our brand's identity data, the web pages building and even a search form or else a handful of call to action buttons. Let us see precisely how this whole thing gets performed inside of Bootstrap 4.
How to utilize the Bootstrap Menu Dropdown:
First off we require a <nav> element to cover things up. It should also carry the .navbar class and also some designing classes specifying it one of the predefined in Bootstrap 4 visual appeals-- just like .navbar-light incorporated with .bg-faded or bg-inverse with .navbar-inverse.
You are able to also employ some of the contextual classes just like .bg-primary, .bg-warning and so on which in turn all incorporated the brand-new edition of the framework.
An additional bright new feature introduced in the alpha 6 of Bootstrap 4 system is you have to likewise assign the breakpoint at which the navbar will collapse to get shown once the menu button gets pressed. To perform this provide a .navbar-toggleable- ~the desired viewport size ~ to the <nav> element.
Next action
Thereafter we require to build the so called Menu tab that will come into view in the place of the collapsed Bootstrap Menu Template and the site visitors will definitely use to deliver it back on. To do this set up a <button> element along with the .navbar-toggler class and some attributes, just like data-toggle =“collapse” and data-target =“ ~ the ID of the collapse element we will create below ~ ”. The default placement of the navbar toggle switch is left, so in the event that you need it right straightened-- likewise apply the .navbar-toggler-right class-- also a bright fresh Bootstrap 4 feature.
Maintained content
Navbars shown up using incorporated help for a handful of sub-components. Pick from the following as needed :
.navbar-brand for your product, project, or company title.
.navbar-nav for a lightweight and full-height navigating ( incorporating support for dropdowns).
.navbar-toggler utilization together with Bootstrap collapse plugin as well as additional site navigation toggling behaviors.
.form-inline for any type of form regulations and responses.
.navbar-text for adding vertically centered strings of words.
.collapse.navbar-collapse for grouping and concealing navbar items by a parent breakpoint.
Here is simply an illustration of all the sub-components incorporated in a responsive light-themed navbar that promptly collapses at the md (medium) breakpoint.

<nav class="navbar navbar-toggleable-md navbar-light bg-faded">
  <button class="navbar-toggler navbar-toggler-right" type="button" data-toggle="collapse" data-target="#navbarSupportedContent" aria-controls="navbarSupportedContent" aria-expanded="false" aria-label="Toggle navigation">
    <span class="navbar-toggler-icon"></span>
  </button>
  <a class="navbar-brand" href="#">Navbar</a>

  <div class="collapse navbar-collapse" id="navbarSupportedContent">
    <ul class="navbar-nav mr-auto">
      <li class="nav-item active">
        <a class="nav-link" href="#">Home <span class="sr-only">(current)</span></a>
      </li>
      <li class="nav-item">
        <a class="nav-link" href="#">Link</a>
      </li>
      <li class="nav-item">
        <a class="nav-link disabled" href="#">Disabled</a>
      </li>
    </ul>
    <form class="form-inline my-2 my-lg-0">
      <input class="form-control mr-sm-2" type="text" placeholder="Search">
      <button class="btn btn-outline-success my-2 my-sm-0" type="submit">Search</button>
    </form>
  </div>
</nav>
Brand
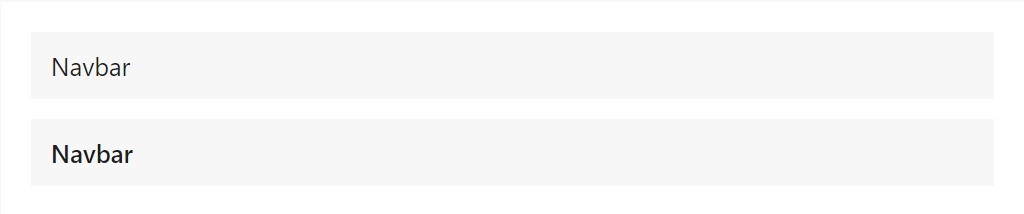
The .navbar-brand can absolutely be employed to the majority of the components, however an anchor operates better considering that some components might call for utility classes or customized appearances.
<!-- As a link -->
<nav class="navbar navbar-light bg-faded">
  <a class="navbar-brand" href="#">Navbar</a>
</nav>

<!-- As a heading -->
<nav class="navbar navbar-light bg-faded">
  <h1 class="navbar-brand mb-0">Navbar</h1>
</nav>
Nav
Navbar navigation urls founded on Bootstrap .nav options along with their own modifier class and demand the utilization of toggler classes for appropriate responsive styling. Navigating in navbars will as well expand to occupy as much horizontal space as possible to maintain your navbar items securely coordinated.
Active states-- with .active-- to point out the recent webpage may possibly be used directly to .nav-links or their instant parent .nav-items.

<nav class="navbar navbar-toggleable-md navbar-light bg-faded">
  <button class="navbar-toggler navbar-toggler-right" type="button" data-toggle="collapse" data-target="#navbarNav" aria-controls="navbarNav" aria-expanded="false" aria-label="Toggle navigation">
    <span class="navbar-toggler-icon"></span>
  </button>
  <a class="navbar-brand" href="#">Navbar</a>
  <div class="collapse navbar-collapse" id="navbarNav">
    <ul class="navbar-nav">
      <li class="nav-item active">
        <a class="nav-link" href="#">Home <span class="sr-only">(current)</span></a>
      </li>
      <li class="nav-item">
        <a class="nav-link" href="#">Features</a>
      </li>
      <li class="nav-item">
        <a class="nav-link" href="#">Pricing</a>
      </li>
      <li class="nav-item">
        <a class="nav-link disabled" href="#">Disabled</a>
      </li>
    </ul>
  </div>
</nav>
Forms
Made different form regulations and components within a navbar utilizing .form-inline.

<nav class="navbar navbar-light bg-faded">
  <form class="form-inline">
    <input class="form-control mr-sm-2" type="text" placeholder="Search">
    <button class="btn btn-outline-success my-2 my-sm-0" type="submit">Search</button>
  </form>
</nav>
Text
Navbars may likely incorporate bits of content using .navbar-text. This specific class adjusts vertical positioning and horizontal space for strings of text message.

<nav class="navbar navbar-light bg-faded">
  <span class="navbar-text">
    Navbar text with an inline element
  </span>
</nav>
One more feature
One other bright brand-new element-- within the .navbar-toggler you should put a <span> with the .navbar-toggler-icon to certainly set up the icon inside it. You are able to in addition set an element using the .navbar-brand here and demonstrate a little relating to you and your business-- such as its label and symbol. Optionally you might choose wrapping the whole item right into a url.
Next we require to make the container for our menu-- it is going to expand it to a bar with inline things above the determined breakpoint and collapse it in a mobile phone view below it. To accomplish this generate an element with the classes .collapse and .navbar-collapse. In the case that you have looked at Bootstrap 3 and Bootstrap 4 up to alpha 5 classes system you will probably notice the breakpoint has been selected only one time-- to the parent component however not to the .navbar-toggler and the .collapse feature in itself. This is the new way the navbar will be created by Bootstrap 4 alpha 6 in this way take note which version you are currently working with if you want to construct things appropriately.
Last part
Finally it is definitely time for the real navigation menu-- wrap it inside an <ul> element with the .navbar-nav class-- the .nav class is no longer required. The particular menu pieces must be wrapped in <li> elements holding the .nav-item class and the actual web links in them ought to have .nav-link employed.
Conclusions
So generally speaking this is simply the construction a navigational Bootstrap Menu Using in Bootstrap 4 should come with -- it is really user-friendly and rather easy -- right now the only thing that's left for you is figuring the correct system and eye-catching titles for your material.
Check a number of video tutorials about Bootstrap Menu
Related topics:
Bootstrap menu main records

Mobirise Bootstrap menu
Bootstrap Menu on the right side
Free Bootstrap Hamburger Menu Compilation
CSS3 Bootstrap Navigation Menu Templates